Friday, October 31, 2014

My Costume is my Face! Black Swan Makeup

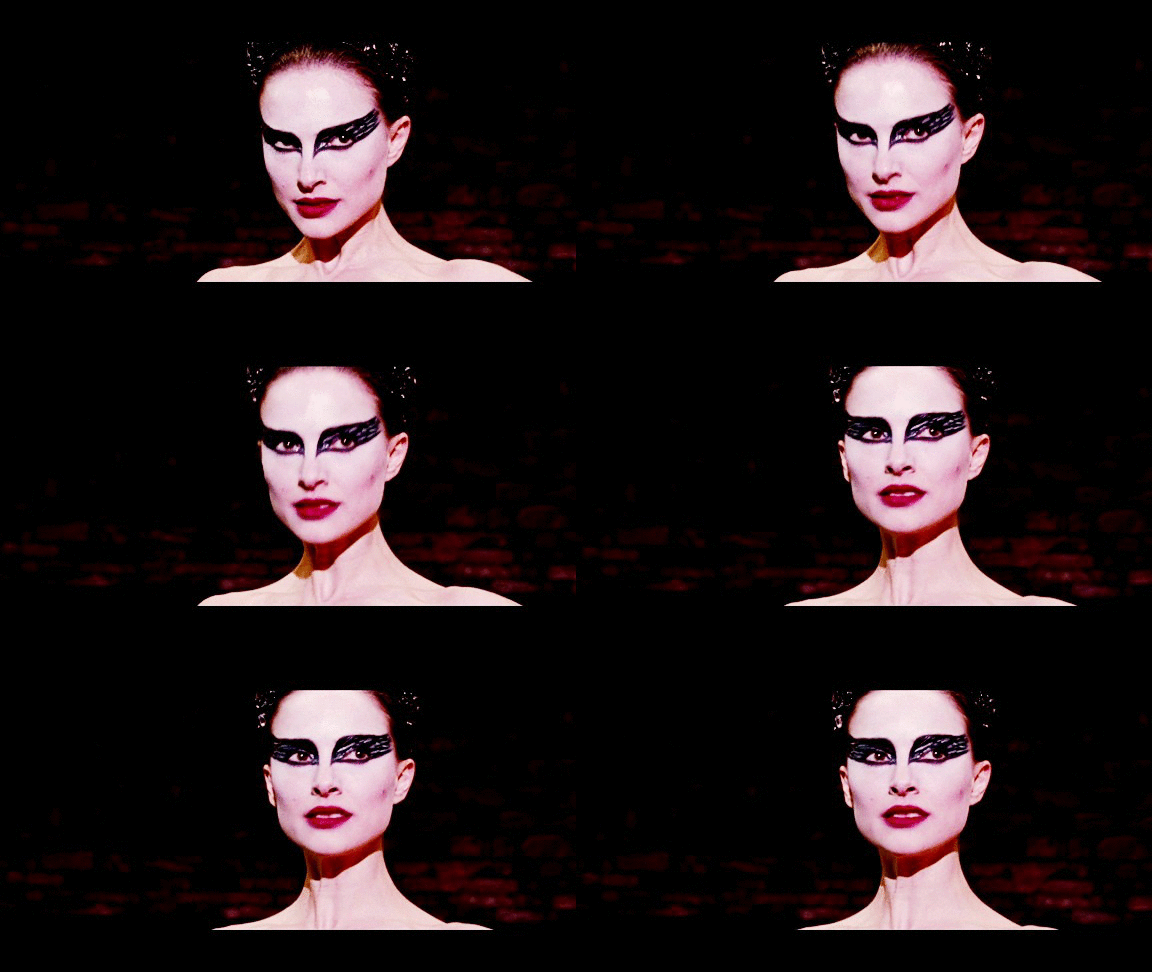
For my final installment of 'My Costume is my Face!' I decided to go with the simple and crowd-pleasing Black Swan makeup. And let me tell you... I felt it.

For this makeup look all I used was some gel eyeliner, my NYX jumbo eyeshadow pencil in Milk, and MAC Chili lipstick. Here's how I created this Black Swan look:
First I used the liner to outline the eyes. The line circles right around the bottom of the eye and extends straight outward toward the hairline. The inner line extends out toward the nose. From the nose I drew the line straight up toward the tip of my eyebrow and extended the line above my eyebrow and out toward my hairline. I also colored in all of my eyelid and eyebrows black. Then I took my Milk pencil and colored in the rest of the area.  Then I took my black gel liner again and did small strokes around my eyes all in the outward direction to make the feathery flicks Natalie Portman is sporting in the movie. Going over the white once makes a gray effect and then going over the white again creates a darker near black effect. Mix up how dark your strokes are! Keep the lowest V part mostly white and work hard to feather out the outer edge near the hairline. Then I put on my deep red lipstick and was done!
The one thing I was missing to complete this look was a beautiful crown so I went ahead and drew this one in :) The best thing about this look is that you don't even need the crown to be obvious! This makeup look is so easily identifiable that you can wear all black and put your hair up and everyone who has been awake for the past few years will know who you are. 
Happy Haunting everyone! Just know that when you wear this look...you have to be PERFECT. 


Check out my other posts from this Halloween makeup series!
Split Face
Owl
Shattered Doll
Lion

Thursday, October 30, 2014

How-To: Make Your Own Festive Halloween Banner!

Happy Halloween everyone! If you want to spice up your Halloween by adding some festive decorations, here's how you can make your very own Halloween banner!
You will need:
Themed scrapbook paper in 6x6 inch squares
scissors
a gluestick
twine
a hole punch
pencil
optional: an exacto knife
First you're going to want to choose the paper you want your flag to be then cut a diagonal line from the corner of one side to the center of the opposite sides. This will create a little penant shaped triangle. 
Then pick out complementary paper to go on your flag and stencil out the letter you need. I used an exacto knife to cut out the letter to waste the least amount of paper as possible. Scrapbook paper can be expensive!
Next, glue the letter down to the center of your flag! You can also add scraps of other paper to your flag to make it look a bit more patchwork-y and cute!
As you write out your festive sentence, try and alternate the colors you are using to mix things up a bit and make your flags more eye-catching!
When you're all done with your flags its time to hole-punch! I punched two holes at the top of the flags and weaved my long string of twine in and out to ensure the flags would stay flat against my wall. 
And voila! My sign turned out to be about 5 feet long and was hung up in the kitchen for all visitors to see and feel the festive spirit!

Happy Halloween everyone!
xxSJ

NOTD: OPI 'DS Indulgence'

Looking for a bewitchingly beautiful orange to wear on this All Hallow's Eve??? Look no further than today's nail of the day, OPI's Designer Series polish in 'Indulgence.'
This orange shade is gorgeous and such an easy formula to work with. Two thin coats was all I needed to achieve opacity, and as you can see the end result is amazing.
This color is an orange-red base with yellow, red, and gold glitters mixed through out. The glitter manages to stay smooth and almost 3-D looking rather than chunky or metallic. I always get compliments when I wear this polish!
This polish looks amazing under any lighting but is particularly stunning when it catches the sun!
OPI polishes can be found at Target, Ulta, some drugstores and department stores for about $8 a bottle.
What's your favorite orange?

xxSJ

Wednesday, October 29, 2014

My Costume is My Face! Split Face Makeup

Symmetry is beauty, so that means this costume look is beautiful, right??? Well, not according to anyone I showed this to because this creeped people out!! Here's how I pulled off this split face makeup look:
I used my BH cosmetics 88 color palette, a red lipliner, a black liquid liner and my NYX Jumbo eyeshadow pencil. 
First I started by drawing the outline of the split with the red lipliner. I chose to go with this symmetrical cone shape down my whole face. Then I filled in and blended with my fingers. I went over the lipliner with red eyeshadow from my 88 color palette. All the shadows in this palette have shimmer in them which I think works to make this look shiny and wet like blood would look. I also added some purple and black in some areas for dimension. I used my NYX Shadow pencil in Milk to outline the red split lightly to make it stand out for. Then I used my black liquid eyeliner to draw some circles up my the sides of the split, parallel to each other. Then I 'laced' the liner up my face. I added some brown smokiness to my eyemakeup and some red lipstick to glamorize this otherwise creepy look!
Overall I love the way this look turned out. I think it turned out realistic and creepy yet still quite glamorous and pretty looking! From start to finish this look took me about 30 minutes, mostly because doing the lines lacing up my face needed to be done with a steady hand to look nice and neat.

Feel free to use this for an easy costume on Halloween using some simple makeup you might already have in your stash!

xxSJ

Check out my other posts from this Halloween makeup series!
Owl
Shattered Doll
Lion

Saturday, October 25, 2014

My Costume is My Face! Feminine Owl Makeup

My next makeup look in my 'My Face Is My Costume' series is this owl look! It took me about 30 minutes to do this realistic yet soft and feminine owl look. Read on to see how I achieved this! 
Above are the products I used! Makeup Geek eyeshadows in Creme Brulee, Beaches & Cream, and Cocoa Bear, my Stila 'Mind' palette, liquid eyeliner, UD eyeliners in 'Smog' and 'Demolition' and my trusty NYX Jumbo Eye Pencil in 'Milk.'
First I defined my brows with a dark brown and extended the outer ends straight out toward my hair line and the inner corner down the sides of my nose and then forming the little beak tip in the center. from there I used my Milk eye pencil in Milk to draw the two big circles around my eyes
I used Demolition (a dark brown) eye pencil to outline the white circles using feathering motions. Then I used lighter colored liners to make smaller circles around my eyes to give a feathered effect. Finally I used a liquid eyeliner to extend my liner inter a thick wing as well as extending it inward to a point at my tear duct. I used a brown lipstick for my lipstick.
Overall I really like the way this cute owl look turned out! It took me about 20 minutes to complete all with makeup I had in my stash. No feathers or special effects needed to create an adorable yet feminine look! Hoot Hoot!

Check out my other posts from this Halloween makeup series!
Shattered Doll
Lion

Friday, October 24, 2014

NOTD: OPI 'DS Extravagance'

This nail polish is by far one of my favorites in my collection and it shouldn't be a mystery why. Just look at it! This Designer Series by OPI polish is in the shade Extravagance and it is one of the most complex, gorgeous colors I've ever seen. It looks like there is a little galaxy on my fingers!

This polish is a magenta purple creamy base with purple, gold, red, and silver sparkles mixed through out.  The formula is one of the best polishes I've used as it is opaque in just one coat and the glitter adds no chunk or difficult in application whatsoever.
Just look at it!!! When this polish reflects in the light, you are sure to get some oohs and aahs! This color is also so pretty for the fall since it has a darker base and festive fall colors in the glitter!

You can find OPI nail polish for about $8 a bottle at Ulta, some drugstores, department stores, and some Targets.

xxSJ

Wednesday, October 22, 2014

My Costume is My Face!! Simple Lion Makeup

For my second installment of My Costume is My Face, I did a really simple yet effective lion makeup that I'm pretty sure ANYONE has the artistic capacity to do! Here's how you can be the queen of the jungle:
I used a simple black liquid eyeliner, Urban Decay 24/7 eyeliner in Smog and Demolition, and Revlon lipstick in 'Champagne on Ice.'
First I darkened and shaped my brows a little more intensely than usual to get that intense cat look. Then I drew on pretty large and dramatic wings for that 'cat-eye' effect. For the adorable little nose, I drew a triangle on the tip of my nose with black eyeliner and then drew a line straight down connecting my nose and upper lip.  I outlined my upper lip to be a little rounder than usual and then filled in with black liner.
For the bronzey lower lip, I lined it with Smog eyeliner (a bronzey gold) and then used Champagne on Ice lipstick to fill in.  For my little whisker freckles, I used Demolition eyeliner (a super dark brown).

I tousled my hair a little bit for a lioness effect and that's it! This look is oh so simple but oh so cute. You can be as fierce of a lion as you want to be while you're wearing this out, or you can be like me and think you're super fierce but really just look like this:
It's all good!

I hope you enjoyed this post and get inspired for the upcoming holiday!

xxSJ

Check out my other posts in this series!